This week, I’m going to write about the two core components of the game UI. The navigation lights and the child status panel. The navigation lights were added because the feedback from the play testing showed that people were getting lost a lot and needed an easier way to navigate the map. The child status panel was added because the old one was long due for a revamp.
So, to start with, the child status panel. This is what the old UI looked like.

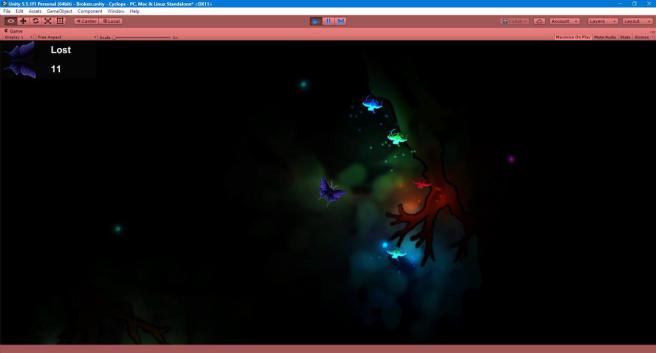
It was simple, but not very intuitive. Several people complained about it being not obvious what “Lost” stood for and a confusion as to what the icon of the player meant. The new UI replaces this with a child status panel. In it, each of the children and their current status (lost, found, being chased by a hunter or dead) are shown. Here’s a screenshot of the child status panel in action.

The blue light is for found, the black overlay is for lost, the X mark is for dead and the red light is for being chased. The panel was implemented with a bit of a long code. It contains eight images. One each for the children and their status. The script which manages the UI contains four GameObject references to the children and four to the status images (the images for the children remain the same, and hence were not accessed via script). Once this base framework was made, it was just a matter of a few conditional statements to get the right status to display on the right image in the UI. The code for this is not included in the post, as it requires components from some of the other scripts, and is probably not too hard to make.
Next up is the navigation light. The other programmer in the team suggested I use vectors to the children from the player, find the point where it crosses the screen, move the light source there and light it up when using the sonar. I came up with an alternative. I added eight lights around the player, in top, bottom, left, right and the 4 corners of the screen. They are positioned and controlled using a script.
void setPos()
{
navLightTop.transform.position = target.transform.position + new Vector3(0, 3, 0);
navLightBottom.transform.position = target.transform.position + new Vector3(0, -3, 0);
navLightLeft.transform.position = target.transform.position + new Vector3(-6.5f, 0, 0);
navLightRight.transform.position = target.transform.position + new Vector3(6.5f, 0, 0);

navLightTopLeft.transform.position = target.transform.position + new Vector3(-6.5f, 3, 0);
navLightTopRight.transform.position = target.transform.position + new Vector3(6.5f, 3, 0);
navLightBottomLeft.transform.position = target.transform.position + new Vector3(-6.5f, -3, 0);
navLightBottomRight.transform.position = target.transform.position + new Vector3(6.5f, -3, 0);
}
public void lightUp()
{
List<GameObject> children = new List<GameObject>(GameObject.FindGameObjectsWithTag("Child"));
List<GameObject> child = new List<GameObject>();
GameObject nest = GameObject.FindGameObjectWithTag("Nest");

while(children.Count>0)
{
float distance = Vector3.Distance(children[0].transform.position, target.transform.position);
GameObject furthest = children[0];

foreach (GameObject entity in children)
{
if ((Vector3.Distance(entity.transform.position, target.transform.position)) > distance)
{
furthest = entity;
}
}

child.Add(furthest);
children.Remove(furthest);
}

if (child.Count > 0)
{
foreach (GameObject entity in child)
{
if ((Vector3.Distance(entity.transform.position, target.transform.position)) > locatorDistance)
{
activateLight(entity);
}
}
}

if(nest!=null)
{
activateNestLight(nest);
}

}
void activateLight(GameObject child)
{
if (child.transform.position.x > navLightRight.transform.position.x)
{
if (child.transform.position.y > navLightTop.transform.position.y)
{
navLightTopRight.GetComponent<Light>().intensity = 1;
navLightTopRight.GetComponent<Light>().color = child.GetComponent<childMovement>().childColor;
}
else if (child.transform.position.y < navLightBottom.transform.position.y)
{
navLightBottomRight.GetComponent<Light>().intensity = 1;
navLightBottomRight.GetComponent<Light>().color = child.GetComponent<childMovement>().childColor;
}
else
{
navLightRight.GetComponent<Light>().intensity = 1;
navLightRight.GetComponent<Light>().color = child.GetComponent<childMovement>().childColor;
}
}
else if (child.transform.position.x < navLightLeft.transform.position.x) { if (child.transform.position.y > navLightTop.transform.position.y)
{
navLightTopLeft.GetComponent<Light>().intensity = 1;
navLightTopLeft.GetComponent<Light>().color = child.GetComponent<childMovement>().childColor;
}
else if (child.transform.position.y < navLightBottom.transform.position.y)
{
navLightBottomLeft.GetComponent<Light>().intensity = 1;
navLightBottomLeft.GetComponent<Light>().color = child.GetComponent<childMovement>().childColor;
}
else
{
navLightLeft.GetComponent<Light>().intensity = 1;
navLightLeft.GetComponent<Light>().color = child.GetComponent<childMovement>().childColor;
}
}
else
{
if (child.transform.position.y > navLightTop.transform.position.y)
{
navLightTop.GetComponent<Light>().intensity = 1;
navLightTop.GetComponent<Light>().color = child.GetComponent<childMovement>().childColor;
}
else if (child.transform.position.y < navLightBottom.transform.position.y)
{
navLightBottom.GetComponent<Light>().intensity = 1;
navLightBottom.GetComponent<Light>().color = child.GetComponent<childMovement>().childColor;
}
}
}
The script sets the light intensity of all eight light sources to zero at start, and re-positions them around the player in each update. Also, if the intensity is greater than zero, it is decreased each update. The script also contains a function (which is not called from this script directly) which lights up correct navigation lights with the correct color when called. The light up function is called from the script for the sonar, each time the sonar is used. It’s working is as follows. The whole game area is divided into 9 parts as illustrated (area 9 is the camera view).

If a child is in the 9th section, no lights are lit up. But if it is in any other section, the light on the corresponding part of the screen is lit up. If there are two children in the same section, then the light will show the color of the closer one. An extra functionality was added later on, to show a light towards the nest (where you should get to, to finish the game) once all children are found and it is active. Anyway, here’s a screenshot of the navigation lights in action.